Can I Upload 5 Product One Time in Shopify
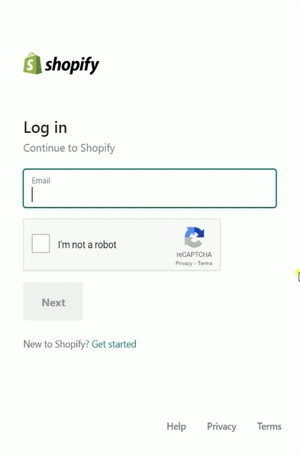
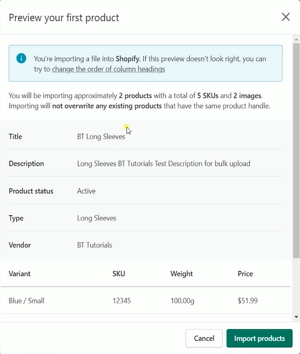
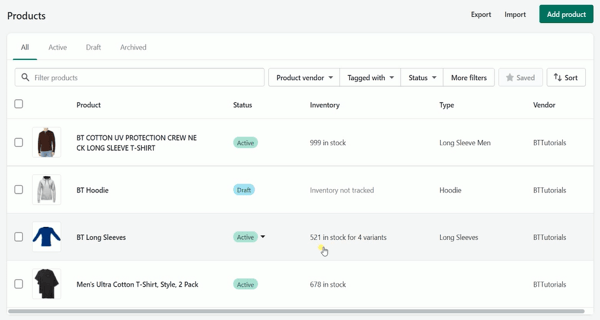
There will come a time on where your business grows and this is the fourth dimension where y'all demand to keep upwards with the market place need. One mode of keeping upwards with your growing concern is to know how to upload your products on your Shopify Inventory in bulk. In that location are a couple of ways in uploading a product in bulk on Shopify. You may upload a big number of items and their information at in one case using a CSV file. If you wish to transmit product data between Shopify and some other system, this might exist useful. If you choose to import a CSV file, be certain to follow Shopify's CSV construction requirements to ensure the file is exported appropriately. Your CSV file must exist nether 15MB in size to guarantee a successful import. Otherwise, the product import from Shopify may exist fractional or fail. This tutorial is basically general knowledge that you lot need to know. We will walk you through all of the columns and how you lot can fill up them upwardly. You tin showtime by logging in to your Shopify Admin at www.shopify.com. In one case you're in, Click Products located on the left side. On the Product folio, Click Import located on the upper right just beside the Add Products button. A pop-upwards should show upwardly and this is where you will drag your file to upload your products on Shopify. Commencement, we need to obtain the CSV file first. Click the Sample CSV template link and on the next folio, click the Sample Production CSV File link to download it then Save and Open up the file on your computer. The cavalcade headings appear in the first row of your product CSV file. A sample production and a few variations are included in the sample file. Our tutorial will be based on these sample products. If your product has variation, then the first row is ever considered every bit the Parent Listing. And so the showtime one is the Handle column. Each product is given a unique name in the Handles Column. Letters, dashes, and numerals are permitted, but no spaces, accents, or other characters, including periods, are permitted. This is also what's going to exist on your URL. If you have multiple variations for your products, then you need to fill in the rows for each of the variations. Next is the title or the name of your product. Later that would be the description of your production. Y'all can have an HTML version of the production description. This can also be raw text that hasn't been formatted in whatever way. Next would be the vendor for your product's name. Enter the type of production you're selling and add tags to the next column. You demand to carve up the tags with a comma. The next 1 would be if your production is published in your store. Valid values for this are True or Simulated. Enter the name of the selection if it exists for a product. There are 3 pick names. This is where yous can specify or indicate your variation. For this case, we will exist adding color and size. You but need to fill the first row or the Parent Listing. The Option value is where yous can specify the types of variation. I'll specify the colors and sizes that I'm going to sell. Indicate the Variant SKU. Inventories tracking services utilize this to proceed rail of inventory. If you're utilizing a custom fulfillment provider, you can't get out this field bare. Signal the weight of your products in grams in the next column. Variant Inventory Tracker is where you will specify who will be tracking your inventory. For this example, I'll have i variant that will be tracked by Shopify. If you specify an inventory tracker, you besides need to specify the quantity in the side by side cavalcade. Variant Inventory Policy is when the inventory level for this product or variation reaches aught, you need to specify how this is handled. If you lot use a custom fulfillment service, and then you can add the proper noun of the service in the Variant Fulfillment Service column. If you are doing this manually, and so you can only identify Manual. Point the toll and the compare price in the side by side two columns. Also, indicate if the variant requires shipping or if this is taxable on the following ii columns. Point the barcode number if you accept 1 for your listing. Next would be the Paradigm Source. In this column, we volition need to get a URL for your product epitome. In this case, we will need an epitome hosting site and we volition exist using Flickr for this example. Upload your images first. You should so see them on the photostream. To get the image URL, nosotros need to go to the image source. Click the image in your photostream. Then click the download button and select view all sizes. Make certain that you select the correct image size. Right-click on the image and select copy image accost. Go back to your CSV file and paste the correct URL on the Image Source Column. Do this for all of the parent listings. If your product has variation, then you can add the URL of your images in the Image Variant column. Shopify downloads the images during the import and re-uploads them into your store. Add an Alt Text for all of your images. If your prototype won't load, then the alt text will exist shown instead. Having an alternative text volition besides help you boost your website SEO. Indicate a gift bill of fare if you have one. The SEO title is what's going to exist shown on the search engine in one case this production shows up on the search upshot. Add an SEO description and make sure that it'due south 320 characters or less. There are a couple of Google Shopping Meta fields columns. This tin exist left blank if you aren't using Google Merchant Centre. Just ignore these fields unless your app needs y'all to fill these up. Get directly to the Image Variation and this is where you lot place all of the images for your variation. This includes the parent listing and all of the child listing or variation. Indicate the Variant Weight Unit as well equally the variant tax code which is available only if you take a Shopify Plus plan. If the Variant Weight Unit is left bare, then the value is automatically set to Kg or kilograms. The terminal column is the status. This is whether the product is bachelor for your customers. You lot can place this as Active, Draft, or Archived. Just notice the fields that need to exist filled and for those that demand to be left bare if information technology's a child listing. sure that you don't make full the fields if those are kid listings. Now that you're done with your get-go production and its variations, you can then add another product. So the first one that we have is a long sleeve. What nosotros'll be adding adjacent is a hoodie. There will be no variation for this product so simply make full up those columns like a parent listing. Do the same procedure that we did earlier. We'll but place the other particular as a typhoon just to see the difference. Later yous have added all of your products, make certain that y'all delete the example products and salvage all of your changes. Rename the CSV file and now this is already fix for upload. Go back to Shopify and drag and driblet the CSV file. Click the Upload and Keep button later. You should then come across an overview of the items that will be uploaded to your inventory. Just click the Import Products button to start importing them. Importing your products may have a while peculiarly if y'all have a lot of items to be imported. One time the product is imported, it should then evidence up straight on your inventory. As you lot tin see, we take uploaded the long sleeves and the hoodie. 1 is Active and the other ane is a Draft. As you tin see, all of the fields that we filled on our CSV file take reflected on the listing that was simply recently uploaded. Now you are all fix. This method of uploading items to your Shopify Inventory is recommended if you have a lot of listing to import. Yous can also utilize this same CSV file for other e-commerce platforms. If yous need assistance in setting this up, we here at BlueTuskr can aid yous in your e-commerce success. You lot can always visit our website at world wide web.bluetuskr.com. ane. Log in to Shopify 2. Obtain the Shopify CSV File 3. Edit the CSV File and add together the products four. Upload the CSV File v. Review Upload Files Bulk Upload Products on Shopify
Obtain the Shopify CSV File

Edit the CSV File
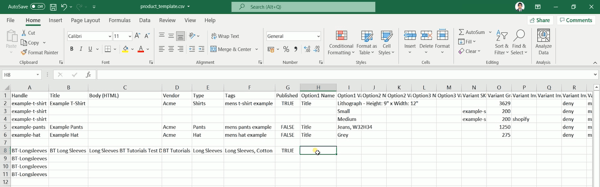
Handle
Title and Description
Vendor, Type, Tags and Published
Product Variations
Inventory Policy and Fulfillment Service
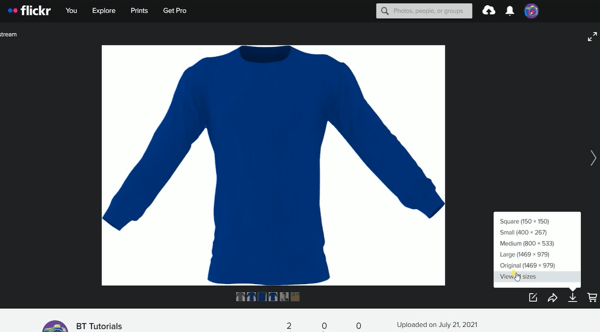
Prototype Source
 SEO Title and Description
 Google Shopping Metafields
Prototype Variation, Weight and Taxcode
Listing Status
Add Another Product
Delete The Example Products
Upload the CSV File
Bulk Import/Upload Products on Shopify Summary

Sentinel the video tutorial hither:
Source: https://blog.bluetuskr.com/how-to/bulk-upload-products-shopify
0 Response to "Can I Upload 5 Product One Time in Shopify"
Post a Comment